TABLE OF CONTENTS
- Adding photographers to EVA.
- Sending camera registration emails.
- Clicking a photographer's name:
- Assigning and unassigning cameras.
- Access rights.
- Automated emails.
Click the gear icon at the top of the page to go to the settings.

You will be on the photographer settings page by default.

Adding photographers to EVA.
- Before adding photographers into EVA, you should choose and setup your image to photographer matching method.
Importing multiple photographers.
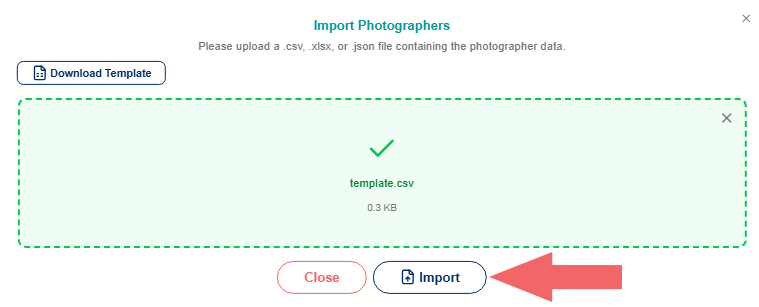
- Click the Import Photographers button to import a .csv, .xlsx or .json file.

- Click Download Template to see the required format for importing photographers' data.

- Fill in the file with your photographers' information.

- Under cameras or photographer identifiers, either enter in the camera hardware ID for each photographer, if you chose hardware ID as your image matching method, or enter the unique identifier for each photographer if you chose to match by filename or folder.
- If you do not know a camera's hardware ID, you can leave this field blank and either you or your photographers can upload an image so EVA can find this information in the image's exif data. Learn more about this below under Assigning and un-assigning cameras.
- Drag and drop the file in the upload box to upload the data to EVA.
- Click Import.
- Click the Import Photographers button to import a .csv, .xlsx or .json file.
Adding one photographer at a time.
- Click Add Photographer.

- Enter the photographer's information.
- Under cameras/Photographer Identifier (optional), either enter in the camera hardware ID for each photographer, if you chose hardware ID as your image matching method, or enter the unique identifier for each photographer.
- If you do not know a camera's hardware ID, you can leave this field blank and either you or your photographers can upload an image so EVA can find this information in the image's exif data. Learn more about this below under Assigning and un-assigning cameras.
- Click Submit.

- Click Add Photographer.
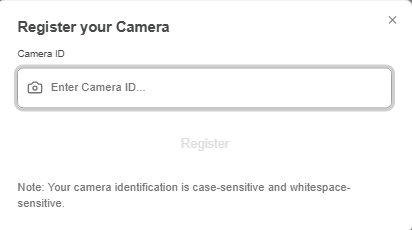
Sending camera registration emails.
- This can only be done if hardware ID was chosen as the image-to-photographer matching method.
- Send a reminder email to all photographers with no assigned camera who have register camera enabled, by clicking the Send Camera Registration email button.
- Click Register Camera in the access rights column to enable camera registration for a photographer.

- Click the Send Camera Registration email button.

- Click Register Camera in the access rights column to enable camera registration for a photographer.
Clicking a photographer's name:

- Enable or disable dashboard access.
- Enable or disable automated emails.
- View their dashboard view.
- Send a photographer dashboard email to give a photographer access to their dashboard for 72 hours.

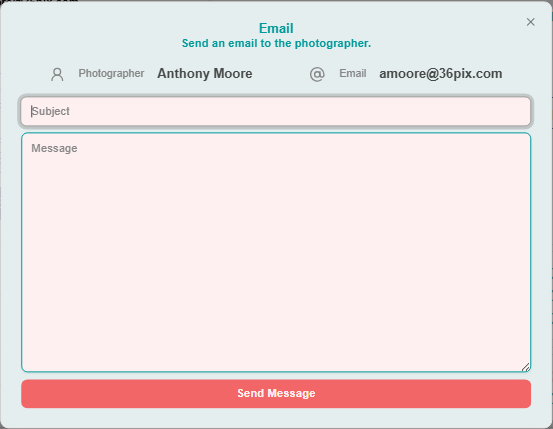
- Send a photographer an email message from EVA. This email will not include a link to their personalized
- Edit a photographer's information.

- Delete a photographer from EVA.
Assigning and un-assigning cameras.
- If a camera was not already assigned to a photographer when importing a photographer's list or adding a new photographer using the Add Photographer button, you can do it in the Cameras column.
- To assign a camera to a photographer, hover over the Cameras column and click the plus sign that appears.

- Click Manual Input to manually enter the camera's hardware ID if you chose the hardware ID image matching method, or photographer's unique identifier, if you chose to match by filename or folder.
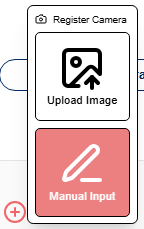
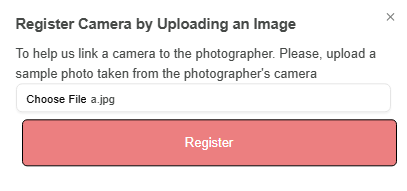
- If camera hardware ID was chosen as the image-to-photographer matching method, you can click Upload Image to upload an image taken with the camera you want to assign, and EVA will find the hardware ID in the image's exif data.

- Choose an image and then click Register.
- The camera will now appear in the camera's column for the photographer.
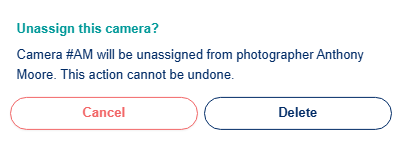
- If a camera that has already been assigned to a photographer is assigned to another photographer, it will be automatically un-assigned from the first photographer.
- To un-assign a camera, click the camera in the Camera column, then click Delete to un-assign the camera.
Access rights.
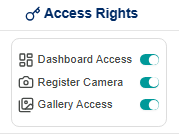
- In the access rights column, or when clicking a photographer's name and then Edit you can:
- Enable or disable gallery access for each photographer.
- Enable or disable camera registration for each photographer.
- Enable or disable gallery access for each photographer, if they have dashboard access enabled.
- In the access rights column, or when clicking a photographer's name and then Edit you can:
Automated emails.
- Enable or disable automated emails per photographer in the Email Automated column or when clicking a photographer's name and then Edit.
- If automated emails are enabled for a photographer, they will receive automated emails each day if the following conditions are met: They had new images uploaded to EVA the previous day and they have not yet logged in to view the images. The email will give them temporary dashboard access for 72 hours.

- If automated emails are enabled for a photographer, they will receive automated emails each day if the following conditions are met: They had new images uploaded to EVA the previous day and they have not yet logged in to view the images. The email will give them temporary dashboard access for 72 hours.